How to create a blog in 2018?
‘Is blogging completely FREE?
 The short answer is “Yes.” You can even create a blog free if you want to.
BUT there are a couple of things you should pay for.
A domain name (www.YourBlogAddress.com) will cost around $10/year (but you can get it free—more about that later).
Web hosting is usually around $4-$15/month or more (although, the host I use and recommend is a bit under $3/mo). In a nutshell, it costs less than a coffee at Starbucks.
Bottom line: If you want to start a serious blog, you’ll need to spend a few dollars to get a domain name and web hosting. We’ll go through these in detail in STEPS 3 and 4.
‘Can I use a blog to make money online?’
 Yes.
Yes.
Some successful bloggers make insane amounts of money ($50k/mo and above), and most of it is passive, too.
There are endless ways to earn money with your blog.
Some folks are offering services, some using Google Adsense program, some are monetizing their blogs with Amazon and some are just selling physical/digital items.
You can learn more about monetizing your blog here: 33 Ways To Monetize a Blog.
But you can set up a blog for fun or as a hobby, too. That’s completely fine and many people are already doing it. I’ve helped to set up blogs for a lot of writers who just want to become a better writer and have no intentions of making money online.
1. Choose Your Blogging Platform
 When starting your blog, there are several platforms to choose from (tumblr, blogger etc..).
However, one that really stands out from the pack isWordPress.
It’s FREE, very user friendly, and perfect for people who’ve never built a blog before.
Why People Use & Recommend WordPress?
- It’s FREE (you only need a web host & domain name)
- There are 5,000+ free & paid WordPress themes available to make your design look top-quality.
- They have super helpful support forum.
- It offers 45,000+ free plugins to help your blog run more smoothly and efficiently.
91% of all blogs are running on WordPress, including this one— WebsiteSetup.org and WordPress is also used by 62% of the top 100 company blogs.
Why you SHOULDN’T create a blog on a free platform
It’s true, you can create your blog free. But it’ll be very limited in functionality, it’ll look boring, and the address will look somewhat childish (e.g., YourBlog.WordPress.com), which diminishes your credibility.
There are some serious flaws in free options you need to know about:
- No Control – Your blog is being hosted on another website (e.g., wordpress.com, tumblr.com, blogspot.com). If you violate their terms of service (even by accident), they can shut down your blog any time (it has happened before).
- No Customization – You can’t use all the free plugins or themes. Heck, you can’t even use custom themes to really make your blog stand out.
- Other Limitations – Free space of only 3GB. For posts, images, and perhaps videos—that’s just not enough.
In short, don’t create a free blog, especially if you’re serious about starting a blog. Later migrating to a better option from a free blogging platform can be very time consuming and tricky.
Instead, create a self-hosted WordPress blog where you don’t have any limitations. Plus, you’ll be able to use your own (professional) domain name.
This leads me to the next step: finding a domain name.
P.S. DON’T DOWNLOAD/INSTALL WORDPRESS YET, YOU’LL NEED TO INSTALL IT IN STEP 4.
2. Choose a Domain Name (www.YourBlog.com)
 Before you go any further, you need to choose a domain name.
Your domain name is important because:
- It’s your “first impression” to website visitors.
- It affects your rankings in search engines.
- It defines your brand.
With that in mind, you should put some thought into your domain name, but not toomuch.
If you come up with something you like within 5 minutes, give it a go. (You can change it later). But here are a few domain tips to get you started:
- Choose brandable over generic. A brandable domain name is unique and stands out from the competition, while a generic domain name is usually stuffed with keywords and unmemorable. (For example, www.LisasRocks.com is more brandable than www.RockCollectingBlog.com.)
- Keep it concise. According to research from Gaebler.com, a magazine for entrepreneurs, the top-100 websites have approximately 6 characters in their domain name.
- Easy to type and pronounce. Your domain name should roll off the tips of your fingers and the tips of your tongue without any problem.
P.S. DON’T BUY A DOMAIN NAME YET, I’LL SHOW YOU HOW TO GET ONE FOR FREE IN STEP 3 (below).
3. Sign Up With Web Host and Install WordPress
What is Web Hosting and Why Do You Need it?
Web Hosting is the service that keeps your blog accessible for everyone. It stores all the files, images and content that your blog has and displays it to the visitors.
If you don’t have a web host, you won’t be able to set up a blog for others to see nor will you be able to use your own domain name.
There Are Good & Bad Hosting Companies
Choosing your host is one of the most important aspect of creating your blog.
Bad web hosts cause most of the issues people have related to their blog. For example, unhelpful customer service and hidden fees are quite common…
Many cheap hosts also overuse servers to cut their costs—and that leads to your site potentially not working just because many people are visiting some other site. Only some cheaper hosts control the resources well, so that your website always works right.
I highly recommend using www.Bluehost.com as your host, and it’s the hosting company I currently use.
Disclosure: Because I’ve used Bluehost and found their hosting great, all links to Bluehost are referral links. I’ll earn a commission if you make a purchase and you’ll get a discounted price. This is how I keep WebsiteSetup.org up and running.
- They have one-click WordPress installation, which makes it easy for you to get started.
- They’ve been officially recommended by WordPress since 2005.
- They’re only $2.95/mo for WebsiteSetup.org visitors + they throw in a FREE domain name.
Of course, you don’t need to use Bluehost if you don’t want to. Feel free to use any other web hosting provider that is suitable with WordPress, reliable, secure and easy to manage (i.e. one-click-install for WordPress).
Here’s a simple step-by-step guide for creating a blog on Bluehost (or any other web host)
- Sign up with a web hosting (I recommend Bluehost).
- Choose the hosting plan (you can pick the cheapest one).
- Pick a domain name for your blog.
- Complete hosting registration.
- Install WordPress.
- Log in and write a blog post.
Altogether, this takes about 5-10 minutes if you follow the instructions (and you have chosen your domain name). So, you can start writing your first post in just a few minutes.
1. Sign up with a web hosting (I recommend Bluehost)
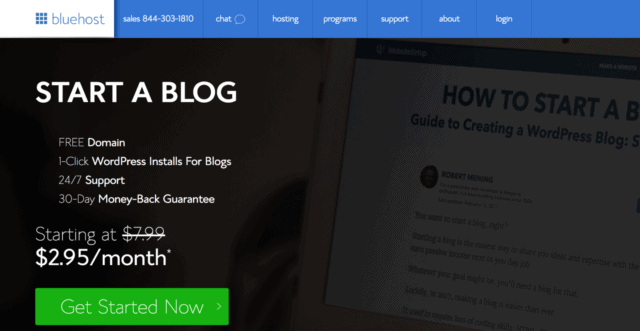
Go to www.Bluehost.com and click on the “Get started now” button. Use this link to get a FREE domain, too.
This discount applies to all websitesetup.org visitors, so make sure you take advantage of it.
2. Choose the hosting plan (you can pick the cheapest one).
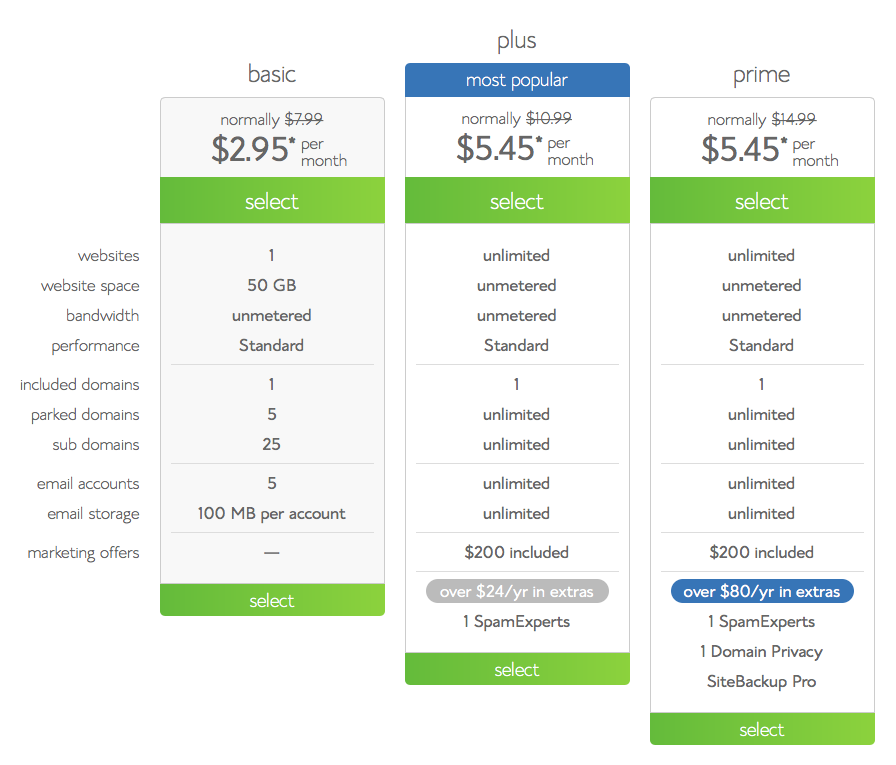
Now it’s time to choose your hosting package.
There are three options: Basic (recommended), Plus, and Prime.
The Basic option is perfect for beginners. The other two aren’t really needed unless you’re getting millions of visitors from day one. Best of all, Basic is the cheapest option so you save some cash, too.
3. Choose the domain name you want (they’ll give it to you for FREE).
Next, you’ll need to choose a domain name.
It doesn’t have to end with .com, so you can also use different endings (such as: .net, .org, or even .co.uk) if your first choice isn’t available.
If you already have a domain name (i.e., you bought it from somewhere else), use the second form on the right (“I have a domain name”).

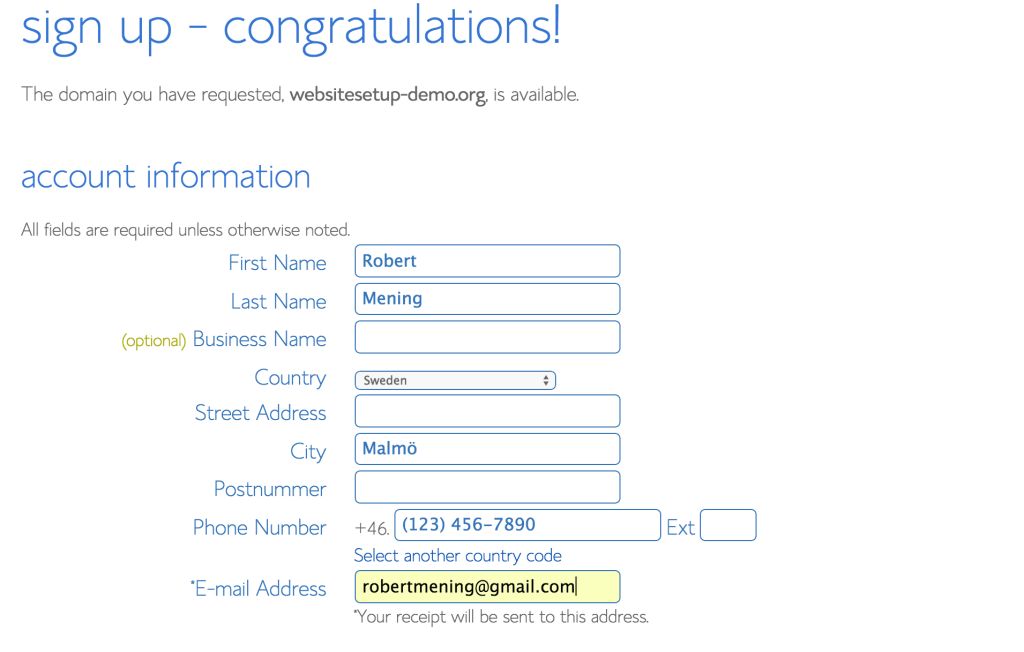
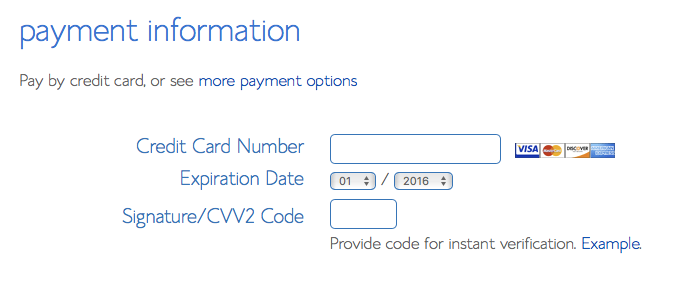
4. Complete your registration
There are three parts to this page. The first is account information.
Just enter your contact information as you would normally.
The next part gives you some service options.
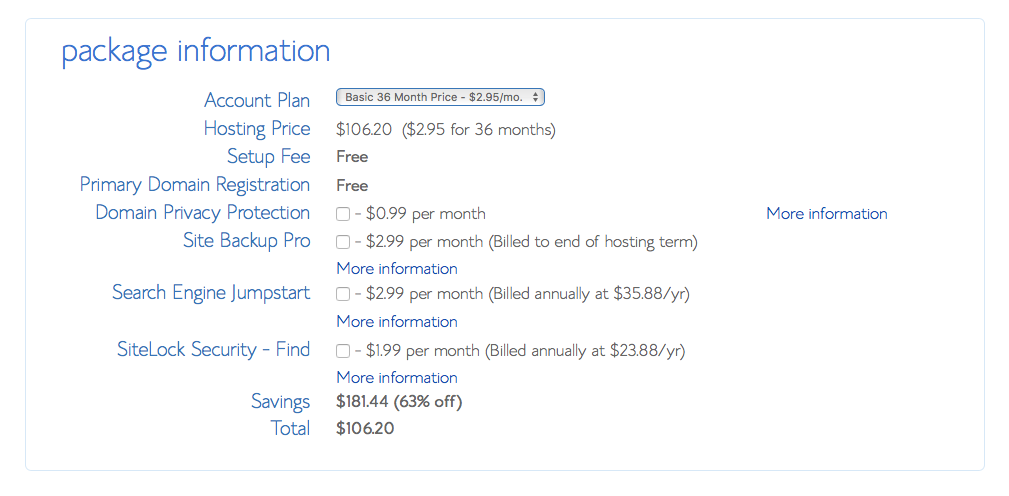
First you need to choose the account plan. Within the Basic option, you can choose to sign up for 12, 24, or 36 months. I’d start off with 12 months.
Next you’ll have some add-on options to choose from. I recommend you don’t go too crazy with these.
That being said, here are two you might want to consider:
- Domain privacy – When you register a domain name, all your information is added to a public database. If you don’t want that, you can tick this option, and BlueHost will appear as the registrant (you still have full control and ownership of the domain). So, this option protects you from spammers. If you don’t mind your information being public, untick that option and you’ll save $0.99 per month.
- Site Backup Pro – While WordPress is quite secure, it’s a good choice to sign up for Site Backup Pro just in case. If you are scared that you’ll mess something up, tick that box to have backups available.
The last part is just your billing info. If you want to pay with PayPal, click the “More payment options” link.
5. Install WordPress with One-Click Installation
Have you set up your hosting with Bluehost yet? Okay, good.
Now you need to install WordPress. Luckily, with the Bluehost’s one-click WordPress install, it shouldn’t take more than a couple of minutes.
Here is the step-by-step guide to install WordPress on Bluehost:
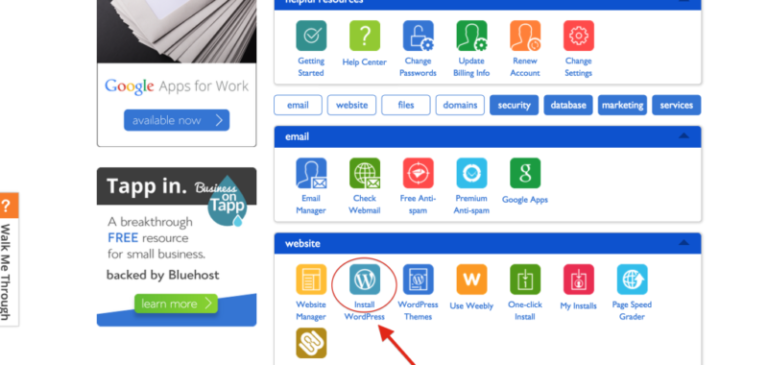
1) Login to your Bluehost control panel at: my.bluehost.com
2) Once you’re logged in, you’ll be redirected to your Control Panel. From there, choose “Install WordPress”.
3) This leads you to the next page where you can choose your blog destination URL. I recommend using your root domain (www.YourNewDomain.com, not www.YourNewDomain.com/blog/), so just leave the field on the right empty.
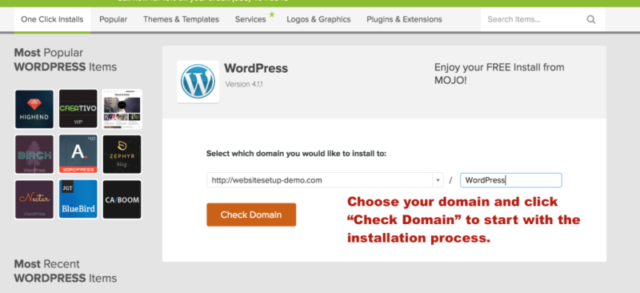
If you need more help installing WordPress on Bluehost, I’ve explained it here (in step-by-step format): How to Install WordPress Blog on Bluehost.
6. Log into your new blog
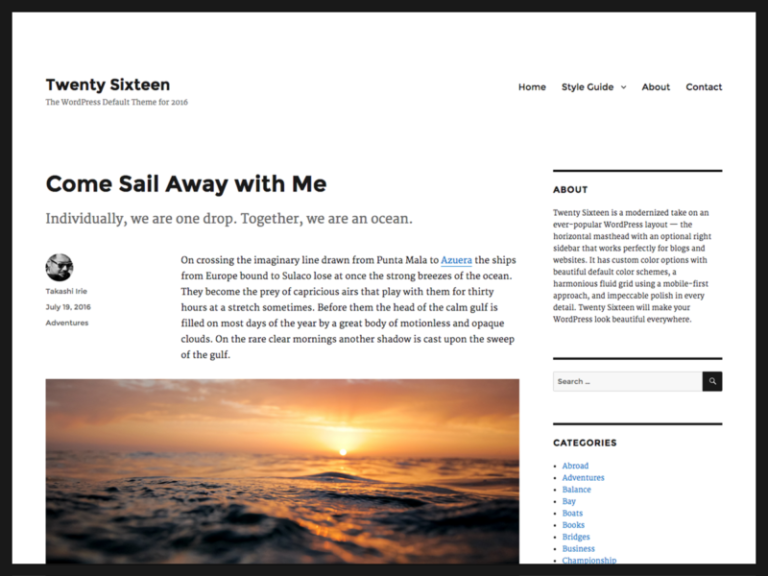
At this stage, you should now have a blank WordPress site installed, along with your admin access username and password written down somewhere.
Start by typing in your new web address (www.YourNewBlog.com) to see what your WordPress blog looks like. Here’s what you’ll probably see:
Next, log in to your admin panel by going to an address like: http://YourNewBlog.com/wp-admin/. (You’ll use the same username and password you chose earlier during the setup.)
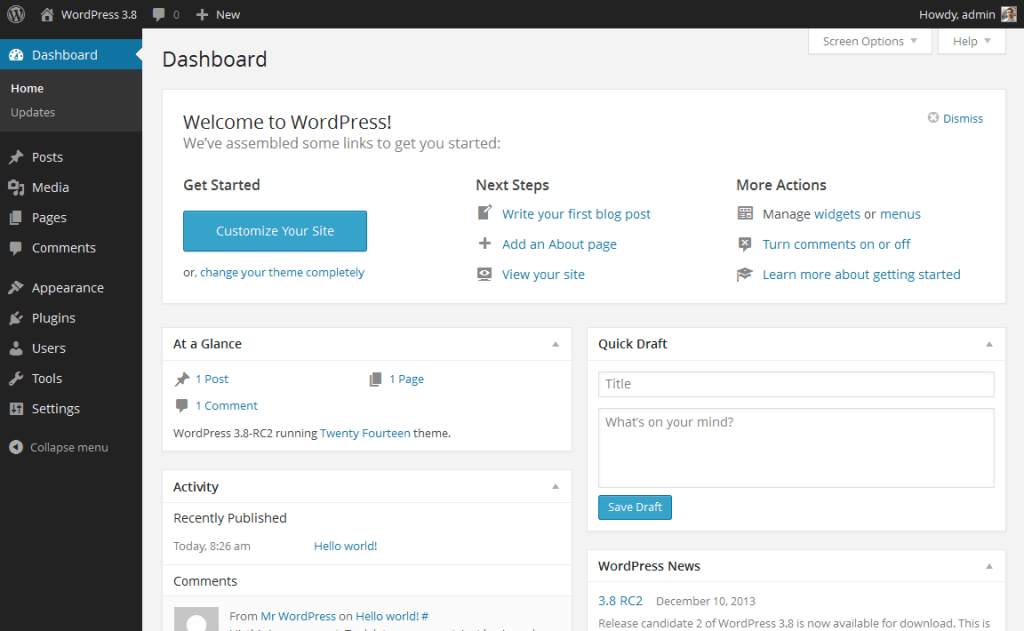
After logging in, you’ll see the welcome page of the admin panel. It should be fairly intuitive after browsing around for a few minutes, with all of your major options helpfully located in the sidebar panel.
4. Customizing and Choosing a Blog Theme
Once you’re inside WordPress dashboard, you can start customizing your blog. We’ll go through everything you need to do to get your blog ready and your first post published today.
You should get familiar with the look and items of the WordPress admin menu. Here are the various admin menu items:
- Dashboard – This is the page you see right after logging in.
- Posts – Here you can write and publish new blog posts and view and edit old ones. We’ll go through this once we’ve set up the blog otherwise.
- Media – This is your media library with all the images, PDFs, videos, etc. you’ve uploaded.
- Links – Many blogs don’t use this at all. You can skip it for now. http://www.mb103.com/lnk.asp?o=7701&c=918271&a=312197&l=10310
- Pages – Here you can write and publish new pages and view and edit old ones. We’ll look at this after choosing your blog design.
- Comments – Everything related to comments. You can get familiar with this when you’ve published your first post and readers leave the first comments.
- Appearance – Here you can change what your blog looks like. We’ll go through this in detail below.
- Plugins – Here you can add and remove plugins, which add functionality to your blog. We’ll go through this after selecting the theme.
- Users – If you create your content with others, you can add them as users here, so they can edit posts. Otherwise, you can skip this for now.
- Tools – Here are some additional tools you can use for publishing posts. You can skip this for now.
- Settings – Here you can edit your blog’s settings. We’ll look at the essential settings later.
To learn more about each one of these (and see screenshots) check out this tutorial from Karol.
Choose a FREE Theme for Your Blog
I think choosing your new WordPress blog design is the most fun step.
The good news:
- You can do it all on your own.
- You can get a FREE WordPress theme that makes your blog look great.
- You can change it later (just don’t change it so often that your readers can’t keep up).
The bad news:
- You can spend a LONG time looking for the perfect theme.
- A WordPress theme is responsible for how your blog looks, so it’s an important decision.
In other words, a WordPress theme is like your car’s frame. It changes how the car looks, but doesn’t impact the features or performance too much.
Luckily for you, WordPress has thousands of great-looking themes already optimized to fit any brand, niche, or industry.
Here’s what to look for in a WordPress theme:
- Simplicity: Unclear design makes it difficult for readers to navigate your blog.
- Responsiveness: The theme needs to adjust its layout across different screen sizes and devices. In the highly mobile world we live in, responsiveness is a necessity.
- Speed: Although most themes don’t slow down your blog significantly, it’s still good to test it. To test a theme’s speed, use the Pingdom Website Speed Test, enter the URL of the theme’s demo, and see how long the page takes to load. If the load time is longer than three seconds, you might want to find a different theme (ideally, the load time is below two seconds).
- Ease of customization: It should be easy to customize the theme—otherwise, you’ll struggle every time you want to tweak something. Fortunately, many themes offer plenty of easy customization options.
- SEO readiness: The theme shouldn’t make a huge difference to search engines. But it’s still better to choose a theme that’s designed with SEO in mind. (Look for “SEO Optimized” or “SEO ready” in the theme description.)
- Security: Themes don’t generally create security issues. But it’s anyway good to check some user reviews and comments—and while doing that, check if people have had security problems with the theme.
Keep these factors in mind when choosing a theme. But most importantly, pick something you love and want your readers to see.
So, how do you find a theme? Here’s a video on how to change/add WordPress themes:

5. Adding Posts and Pages
Okay, now you should be all set up with WordPress. So, now for the fun part – it’s time to create your first blog post! I’ll take you through each step of this process to make it easy for you.
Go back to your WordPress admin panel (http://your_domain.com/wp-admin/) and then to “Posts » Add New” (or “Pages » Add New) from the left sidebar.
What you’ll see is a very friendly editor screen that should remind you of MS Word or Pages on Mac:
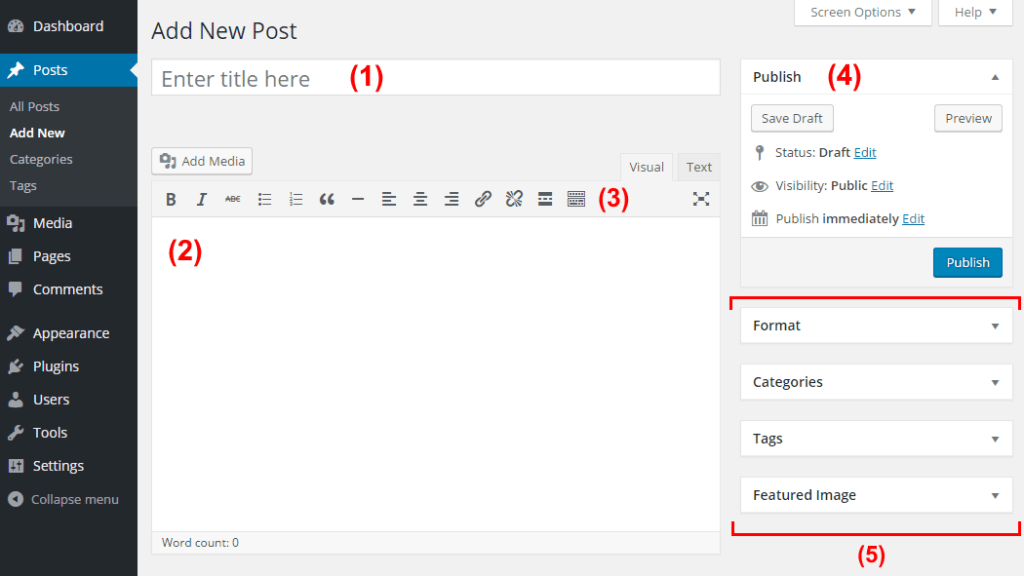
Let’s break down what you’re seeing here:
- Title Area: This is where you write the title of your post.
- Content Area: This is where the body text of your post goes. The whole area works just like text editing in Word or Pages. You can also add images and other media to your post by clicking the “Add Media” button.
- Standard Editing Tools: Here are options like bold, italic, lists, paragraphs, and headlines.
- Publishing Tools: This is where you get your post shown to the world; chief among them is the big blue “Publish” button. You can also set a publication date to schedule your post in the future or save the post as a draft for more editing.
- Additional Fine-tuning Tools: Update your blog post and categorize it (you can learn more about WordPress categories and tags here).
Here are a few things to keep in mind:
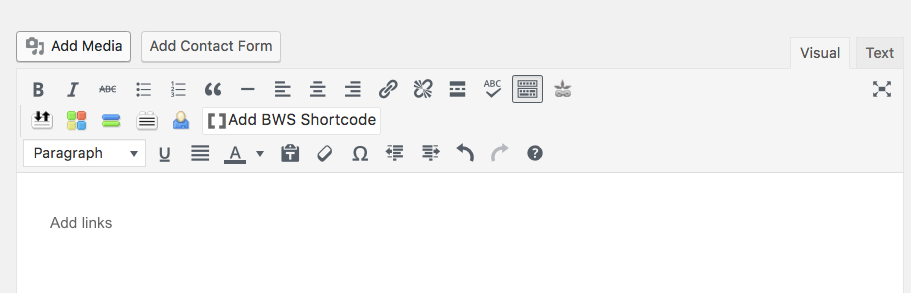
Adding links to your posts: You should use outbound links to other websites when needed to back up your claims. For example, if you’re writing an article about meditation, you can link to a study that showed that meditation helped people feel calmer. To add links to your posts, highlight the desired text, then scroll up to the blog menu.
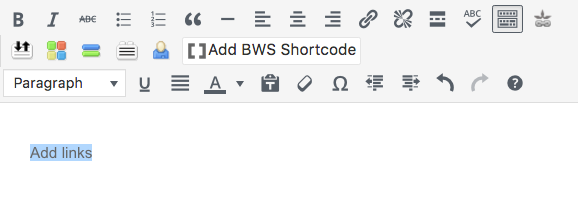
Click the paperclip-looking item to the right of the “Align right” item (above the “Add BWS Shortcode”).

From there, add the URL you want to link to:
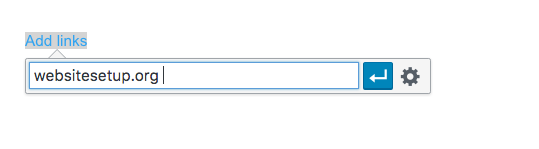
Then, click the Settings icon on the right (the wheel-looking item above, next to the arrow).
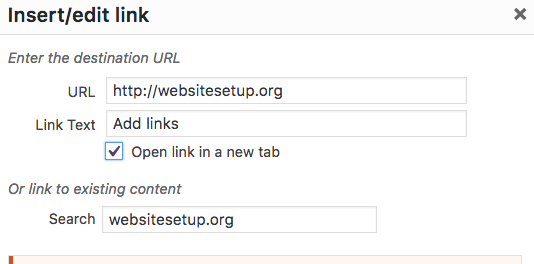
Click the “Open in link a new tab” box. This is important—you don’t want people to leave your site when they click on a link!
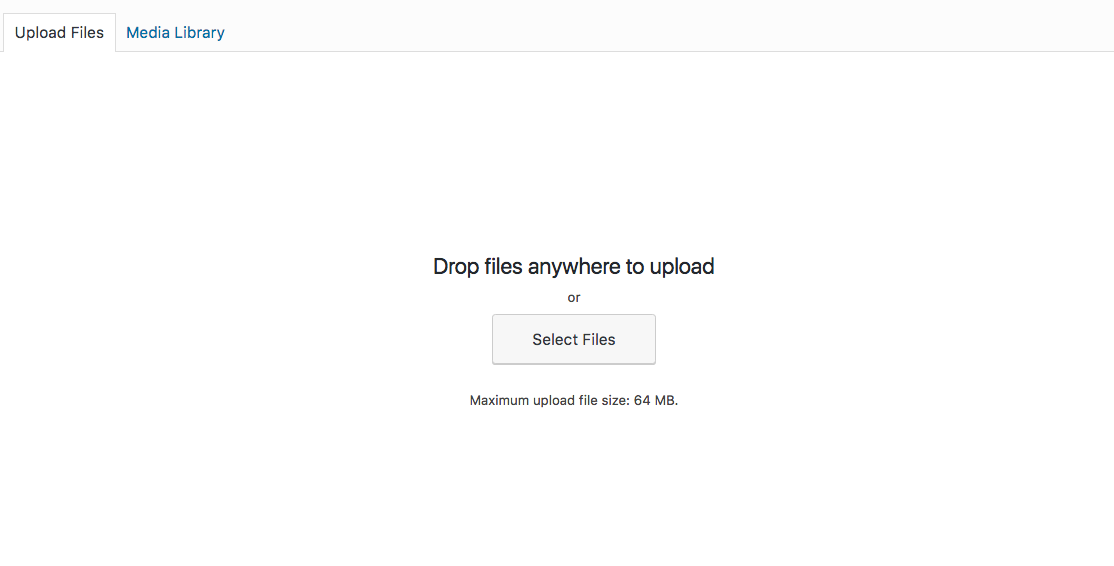
Adding Images to your posts: I touched on this briefly before, but I’ll explain it more here. Start by scrolling up to the top of the blog menu and click “Add Media”.
From here, select the files you’d like to upload. You can find previously uploaded files from the “Media Library” at the top-left corner next to “Upload Files”.
Once you’ve uploaded an image, you can choose its size and placement.
To add a featured image (the image that will be at the top of your post and in the thumbnails of your article), scroll to the right sidebar of your blog menu. You’ll see an option titled “Set featured image”. Click that, then go through the same uploading process to add in a featured image here.
Adding videos from YouTube: Adding in a video can spice up your post. This process used to be a bit complicated, but after some recent WordPress updates, it’s easy.
All you have to do is copy the YouTube video URL into the content area. Make sure that the URL is on its own line and not clickable. When you publish the post, the video will appear. I told you it was simple! Our friends at WPBeginner have a guide for this if you need any further help—check it out here.
Creating the slug: Your slug is the URL of the post. You want to make this slug clear and concise. This will make it easier for people to share it on social media, and overall it will just look better.
You can find the slug underneath the post title. It will say “Permalink: http://yourdomain.com/post_title”.
Sometimes, the title of your blog post will make the perfect slug. But usually, it will be too long, and you should change it, so that it’s no longer than 2-4 words.
Here are some tips for optimizing your WordPress slugs:
- Target SEO keywords. Think of what people would type to Google when they search for the information you share in the post—those are SEO keywords.
- Avoid duplicates (make sure it’s not the same as another slug on your website).
- Don’t change the slug after publishing the post (unless you absolutely have to) as this will result in lost traffic.
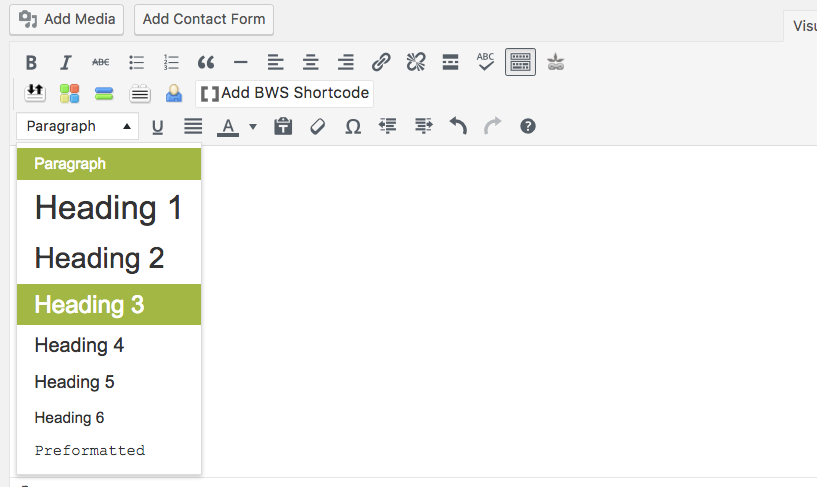
Adding headings: Headings help you structure your content and make it easier for people to read. Consider adding headings for each of your main points.
To add a heading, scroll up to “Paragraph” drop-down menu. Select the heading you’d like to use. Note that the “Heading 1” is usually reserved for the post’s title, so stick to the smaller headings (with larger numbers) inside the post.
Publish Your Post (or Page)
When you’re done working with your post, click the “Publish” button and then the “View post” link that’s going to appear at the top of the page (you’ll see your post live on the site).
Congratulations! You just published your first blog post. Before you share it with others (which is the next step), let’s add a simple tracking system to your site, so you’ll see exactly how many people you’ve reached.
6. Get Traffic and Monetize Your Blog
No blog is complete without compelling content.
To start, you should figure out the topic(s) that your blog will focus on. Then, come up with 10-15 ideas for new posts. Make these posts a mix of informative and entertaining.
You’ll also want to err on the side of creating evergreen content (content that doesn’t become dated/is always relevant) versus news/current affairs content (which becomes dated and irrelevant). Evergreen content will continue to generate traffic overtime, while other content will run its course and become irrelevant.
Here are some tips for creating strong blog content that your audience will love:
- Start by creating a lead-generating content marketing strategy.
- Follow this guide for creating strong blog posts.
- Develop a reading habit, so you can internalize how great writers write.
- Make your content scannable with headings, short paragraphs, and high quality images.
- Write content that helps your audience solve a problem.
- Follow this strategy to become a better blog writer in 30 days.
- Use this formula to create stronger headlines (if your headlines aren’t compelling, people won’t read the content!).
Promoting your blog:
If you want more blog readers as well as the opportunity to monetize your blog, you need to promote your blog.
Turning a blog into a profitable business is doable if there’s enough traffic.
Traffic = customers and money.
How to make a blog with sustainable traffic? All you need is:
- A content plan (i.e., what will be your blog’s main topic)
- A game plan for social media (i.e., which social media sites you’ll use and what content you’ll share)
- Some basic knowledge of SEO (traffic from Google)
To make things easier for you, I wrote a super in-depth article here: How to Increase Blog Traffic for FREE. It’s long, but then again, I go into a LOT in detail.
For now, here are some tips to get started promoting your blog:
- Start collecting your blog visitors emails by setting up an email marketing software.
- Read through this for SEO, usability, and Google guidelines.
- Check out these videos on YouTube about SEO.
- Don’t be spammy on social media. Instead, aim for a good mix of social media content—share blog posts and videos, as well as content from other influencers, and also share other interesting and value-adding statuses.
- Answer questions on Quora.com and link back to your blog.
- Post and promote on relevant Subreddits on Reddit.
- Use republishing to get featured on large websites.
Next steps to start your blog today
Now that you know exactly how to start a blog, it’s over to you. So, I hope you’re ready to take action!
If you want to share your ideas or expertise with the world, build an audience or community, or make money with a blog, start now by getting it set up. It only takes a moment, but still many people get stuck with it thinking, “I’ll do it a bit later.”
So, here are the steps to take:
- Go to Bluehost now to get your blog setup (you even get a free domain).
- Choose a theme that makes your blog look the way you want.
- Add the few important pages.
Write your first post (for example, write a short post about why you’re interested in your topic and what you’ll be writing about, so all your readers can see right away what your blog is about).
If you found this guide useful, I have one request for you: let me know via Facebookwhat action you’re going to take right now—are you going to actually start your blog?